Have you ever thought about turning your home into your very own art gallery? Imagine walking through your living room and being surrounded by the pieces you’ve created, each one telling its own story. Creating a home gallery doesn’t have to be complicated or expensive—it’s all about finding the right space, curating your art, and displaying it in a way that reflects your personality.
Step 1: Define Your Space
The first step to creating a home gallery is deciding where you want to display your art. Not every wall or corner in your home will work for a gallery, so it’s essential to choose a space that enhances the artwork and complements your home’s layout. This doesn’t mean you need to dedicate an entire room to your art (though if you have the space, why not?). You can transform a hallway, living room, or even a stairway into a gallery area.
Here’s what to consider when choosing your space:
- Wall Space: The size of the wall matters. Do you have large walls with plenty of room for bigger pieces, or is your space better suited for smaller, more intimate works? You might even decide to go for multiple walls if you’re working with a hallway or an open space.
- Lighting: Natural light can do wonders for making artwork pop, but you also want to avoid spaces where the sunlight is too harsh or direct, as this can cause damage to your art over time. Choosing a space with controlled lighting or adding soft, ambient light can create a cozy, gallery-like feel.
- Furniture and Decor: Consider the existing layout of your room. You don’t want your art to be overshadowed by large furniture or clashing decor. If possible, rearrange furniture to give your artwork the spotlight it deserves.
Once you’ve chosen your space, you’re ready to move on to the fun part—curating your art!
Step 2: Curating Your Collection
Now that you’ve defined the space, it’s time to decide which pieces of art to showcase. Curating your collection is about telling a story with your artwork. Whether you’re showcasing your own pieces or a mix of works by other artists, it’s essential to think about how these pieces work together to create a cohesive, visually pleasing experience.
Here are some tips to curate your collection:
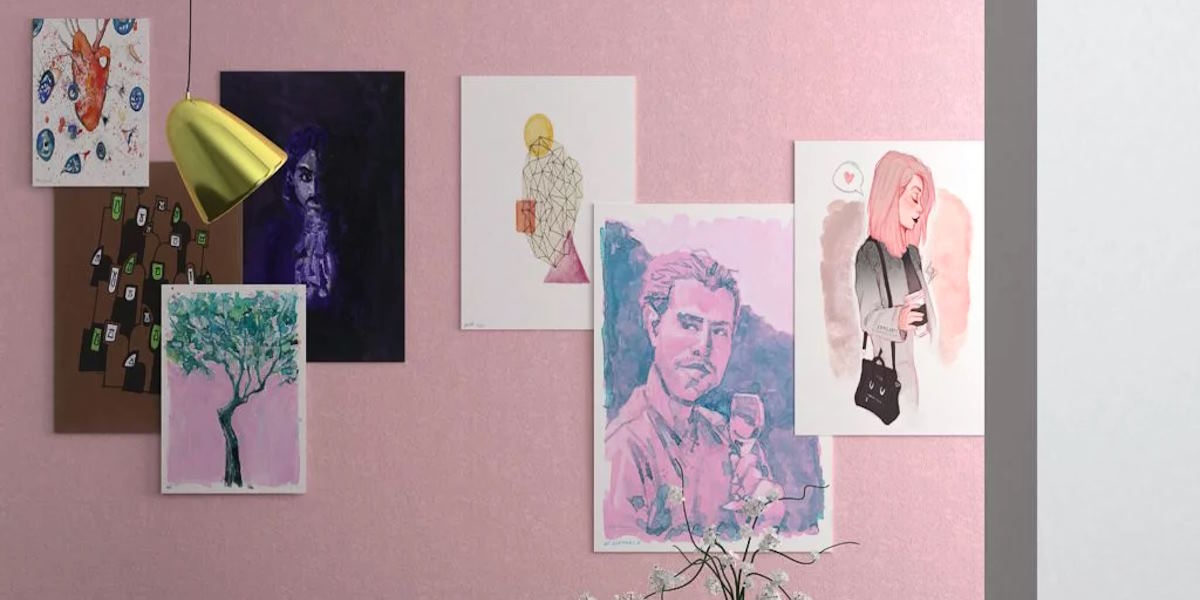
- Theme or Style: Do your pieces share a similar theme, color palette, or artistic style? You might want to group works that complement each other, creating a flowing, harmonious feel throughout the space. For example, grouping together minimalist black-and-white pieces can create a sleek, modern vibe, while bright, colorful paintings can bring energy to a room.
- Size and Proportion: Balance is key when arranging artwork. If you have several large pieces, consider spacing them out or anchoring them with smaller pieces. You don’t want to overwhelm one part of the room while leaving another feeling bare.
- Storytelling: Your gallery is a reflection of your artistic journey. You might want to arrange pieces in chronological order, showing your growth as an artist, or group them based on subject matter or mood. Think of your collection as chapters in a book, with each piece contributing to the overall narrative.
Take your time selecting the pieces you want to display. Remember, less is often more when it comes to creating a gallery—overcrowding can distract from the individual beauty of each work.
Step 3: Choosing Frames and Display Materials
Once you’ve curated your collection, it’s time to think about how to present each piece. Just like the perfect outfit needs the right accessories, your artwork needs the right frame or display method to truly stand out. Framing is an important detail that can either enhance or detract from your art, so it’s worth taking the time to choose wisely.
Consider the following when selecting frames and display options:
- Consistency: While you don’t need to use identical frames for every piece, it’s a good idea to maintain some level of consistency. For instance, you might choose frames of similar colors or materials, even if they vary slightly in style or size. This helps tie the collection together and creates a more cohesive look.
- Frame Material: Wooden frames often lend a classic, warm feel, while metal or acrylic frames can give a more modern, sleek vibe. Think about the tone you want to set for your gallery. Does your art feel more at home in a traditional setting, or does it thrive in a contemporary space?
- Matting: Adding a mat around your artwork can give it room to breathe, drawing attention to the piece itself rather than the frame. It’s particularly useful for smaller works, as it adds an extra layer of depth and sophistication.
- Alternative Displays: Not every piece needs to be framed. If you have sculptures, ceramics, or other 3D works, consider using shelves, ledges, or stands. This can create a dynamic, layered look that draws the eye around the room.
Step 4: Planning the Layout
Now that you’ve selected your art and framed it beautifully, the next step is arranging it on your walls. This is where the magic happens—arranging your artwork to create a visually balanced and aesthetically pleasing gallery.
Here are a few layout ideas to inspire you:
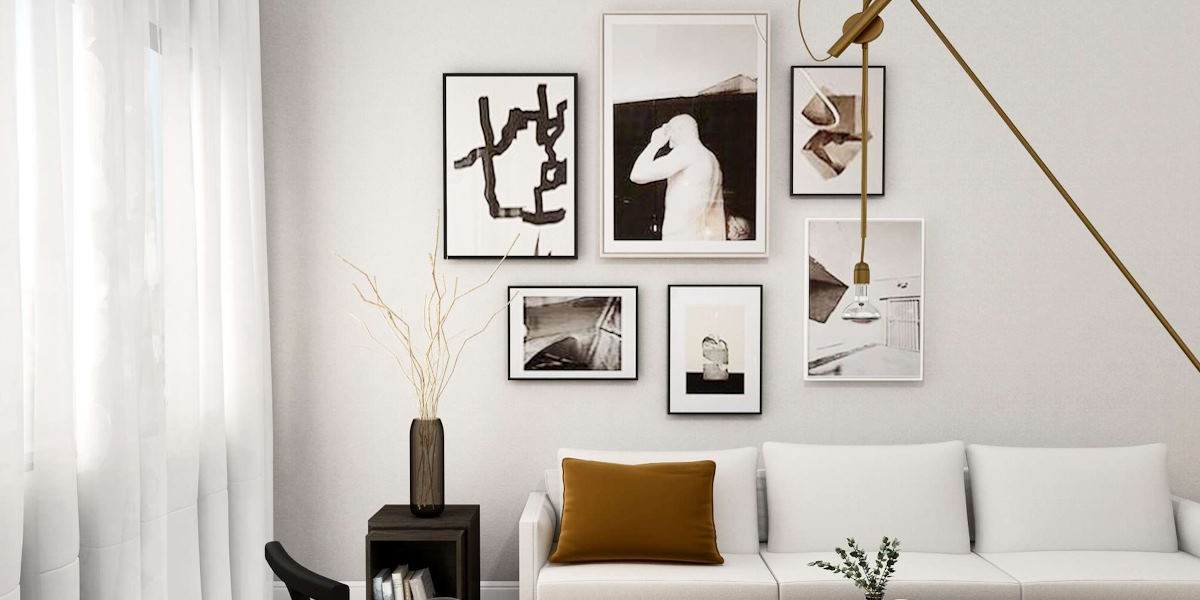
- Grid Layout: A grid layout involves arranging your art in a symmetrical, structured pattern. This works well if you have several pieces that are similar in size and theme. The uniformity creates a polished, gallery-like look.
- Salon Style: For a more eclectic and creative feel, try a salon-style arrangement. This involves placing pieces at different heights and angles, creating a more dynamic and less formal look. It’s perfect for mixing different sizes and styles of art.
- Centerpiece Focus: Choose one large piece as the focal point of your gallery and arrange smaller pieces around it. This works particularly well if you have a statement piece that you want to highlight.
Before you start hanging everything up, try these tips:
- Use paper cutouts of your art’s size and arrange them on the wall before committing to nails.
- Take a photo of your layout to visualize the final result and make adjustments if needed.
- Start with the largest piece and work your way out, filling in the gaps with smaller works.
Step 5: Lighting Matters
Lighting can make or break your home gallery. Proper lighting brings out the colors, textures, and details of your artwork, while poor lighting can make even the most stunning pieces look flat and dull. Natural light is great, but it isn’t always reliable or consistent, so you’ll want to consider adding artificial lighting to ensure your art looks its best at all times.
Here are a few lighting tips for your gallery:
- Track Lighting: Track lighting allows you to direct light onto specific pieces, much like in professional galleries. This is a great option if you have multiple pieces to illuminate.
- Spotlights: For individual pieces, a well-placed spotlight can create drama and focus attention on the art.
- Avoid Harsh Lighting: Be mindful of harsh lighting that can create unwanted shadows or glare. Soft, diffused lighting tends to work best for artwork, creating a gentle glow without overwhelming the viewer.
Good lighting can elevate your home gallery from ordinary to extraordinary, making each piece of art shine.
Step 6: Incorporating Sculptures and 3D Art
If your art collection includes sculptures or 3D works, don’t forget to incorporate them into your gallery. While wall art typically gets most of the attention, sculptures and mixed-media pieces can add depth and texture to your space.
Here’s how to showcase 3D art effectively:
- Shelves and Ledges: Install floating shelves or ledges to display sculptures alongside your framed pieces. This creates a layered, multi-dimensional look.
- Pedestals: For larger sculptures, a pedestal or stand can create a gallery-like display, drawing attention to the piece.
- Balance: Be mindful of how your sculptures interact with the wall art. You don’t want to overwhelm one side of the room while leaving the other feeling empty. Balance is key.
Step 7: Adding Personal Touches
A gallery is not just about the art on the walls—it’s also about the atmosphere you create around it. Adding personal touches can make your gallery feel warm, inviting, and uniquely yours. Consider incorporating other decorative elements that complement your artwork without stealing the spotlight.
Some ideas for adding personal touches:
- Plants: A few well-placed plants can add a touch of greenery and bring life to your gallery. Choose low-maintenance plants like succulents or ferns that won’t distract from the artwork.
- Books and Collectibles: If you have art books, travel souvenirs, or other personal items, consider placing them on shelves or tables near your artwork. These items can tell a story and give context to the art.
- Textures: Incorporate different textures through rugs, throws, or cushions. This adds warmth and can create a cohesive flow between your gallery and the rest of your home décor.
Recommended To You